Well, it's 1:30am on a Wednesday night and I can't sleep for love or money, so, to keep my mind off my navel and the gig lined up for Saturday (which is stirring up tremendous excitement within me), I am going to type out a few tidbits of info to do with guitars and their history. I hope you enjoy reading them.
1. The guitars origins are to be found in central Asia and India.
2. The oldest known representation of a guitar being played is a Hittite carving that is almost 3 and a half thousand years old.
3. It is believed that the word 'guitar' has it's origin in Persian. Tar means string in Persian.
4. The Lute, an instrument that no doubt influenced the conception of the modern guitar, was played by the Norse hero Gunther in the Legend of Siegfried. He played it with his toes while dying in a snake-pit.
5. Nigel Tufnel of the band Spinal Tap repeated Gunthers trick in the Movie, "This Is Spinal Tap".
6. Although the guitar is generally strung with six strings, guitars can be bought with as many as 11 strings. 12 string guitars are strung in 6 pairs of octaves. There are also different types of guitars that can have a multitude of strings tuned to notes as drone strings as with certain slide guitar models, or strings to be plucked without fretting as with Harp guitars.
7. The first electric guitar was built in the 30's.
8. The composer Franz Schubert composed his music on guitar. He couldn't afford a piano.
9. Leo Fender, Inventor of the Stratocaster and Telecaster, wasn't a guitarist. He played Saxophone.
10. The smallest guitar in the world is 10 micrometers long. It was made by researchers at Cornell University, and when the strings are plucked by an atomic force microscope, they resonate, though inaudibly. 10 micrometers is about the same size as a blood cell, so it stands to reason that only a fairy midget could benefit from the thing's existence.
"Oh boy, Sleep! That's where I'm a Viking!"
Wednesday 16 November 2011
Saturday 12 November 2011
The final two modes - Phrygian and Locrian
Up until now I've been treating each mode on it's own. I've done so because each of the modes I've treated 'till now have been quite different to one another in terms of their steps, sound and application. I have chosen to write about the Phrygian and Locrian modes together only because each contains a flattened second, which sets them apart from the others and also gives them a sort of 'exotic' sound when played.
Here, again, is the C Ionian (major scale)

In order to change the Ionian to the Phygian mode, one flattens the second, third, sixth and seventh degrees of the Ionian, and so in the case of C, one plays the notes

What one gets when one uses this mode is an exotic sounding minor scale. Below this is a tab of the scale played up near the nut.

The Locrian mode is the same but for one note difference. In the case of the Locrian mode, the 5th degree is flattened as well. This tailors the scale to work well over diminished chords as well as minor7flat5's and so forth.

I am tabbing out in the first position for one octave from C to C. The C Locrian contains no open strings if the guitars in standard tuning.

Bootiful.
By now, so long as you've had a look at all of the other articles on modal playing that I've published, you should be well able to figure out how to apply these modes all over the neck of your guitar, so this time round, I am not going to provide tabs for them in all positions. Instead I'm going to leave it up to the interested reader to do so.
In the future, I will be posting licks and fingering exercises that will draw on one's knowledge of modes and modal playing. I found it easy to learn the modes in the order that I have written about them in my blog. Perhaps you will too. I've seen people demonstrating them in other ways, but I found them generally confusing. I will write about one of these ways later today or tomorrow. I found it unhelpful to me because, instead of concentrating on the qualities of the modes - what they sound like and their applications - it shows another way that they all relate to the Ionian mode in a startling pattern of sequence. Music is an art for the ear and I learnt them by their sounds and the fingering used to achieve them. I think it easier to do so that way.
if you find my article helpful you can follow my blog or like my Facebook page. I write frequently on the subjects of guitar music theory and technique, Luthiery and general things that tickle my fancy. I play in a band called The Gents of Leisure and if you're interested, you can check out our Facebook page www.facebook.com/thegentsofleisure for some music and news of our whens and wheres.
Until the future,
May The Force be with You.
Here, again, is the C Ionian (major scale)
In order to change the Ionian to the Phygian mode, one flattens the second, third, sixth and seventh degrees of the Ionian, and so in the case of C, one plays the notes
What one gets when one uses this mode is an exotic sounding minor scale. Below this is a tab of the scale played up near the nut.

The Locrian mode is the same but for one note difference. In the case of the Locrian mode, the 5th degree is flattened as well. This tailors the scale to work well over diminished chords as well as minor7flat5's and so forth.
I am tabbing out in the first position for one octave from C to C. The C Locrian contains no open strings if the guitars in standard tuning.

Bootiful.
By now, so long as you've had a look at all of the other articles on modal playing that I've published, you should be well able to figure out how to apply these modes all over the neck of your guitar, so this time round, I am not going to provide tabs for them in all positions. Instead I'm going to leave it up to the interested reader to do so.
In the future, I will be posting licks and fingering exercises that will draw on one's knowledge of modes and modal playing. I found it easy to learn the modes in the order that I have written about them in my blog. Perhaps you will too. I've seen people demonstrating them in other ways, but I found them generally confusing. I will write about one of these ways later today or tomorrow. I found it unhelpful to me because, instead of concentrating on the qualities of the modes - what they sound like and their applications - it shows another way that they all relate to the Ionian mode in a startling pattern of sequence. Music is an art for the ear and I learnt them by their sounds and the fingering used to achieve them. I think it easier to do so that way.
if you find my article helpful you can follow my blog or like my Facebook page. I write frequently on the subjects of guitar music theory and technique, Luthiery and general things that tickle my fancy. I play in a band called The Gents of Leisure and if you're interested, you can check out our Facebook page www.facebook.com/thegentsofleisure for some music and news of our whens and wheres.
Until the future,
May The Force be with You.
Friday 11 November 2011
Using the Aeolian mode.
Over the last month I have written articles to explain some of the elements of the Ionian, Dorian, Lydian and Mixolydian modes. I have tried to present them in an order that, for one approaching the subject of modal playing from the beginning, would be simplest to internalize and apply.
The subject of today's article - the Aeolian mode - can also be referred to as the Natural Minor Scale. I always begin by offering up the C major scale (or, in other words, the C Ionian mode) as it is by altering this scale that one acquires the others.

The C Aeolian differs from the C ionian as follows:

The Aeolian mode, or Natural Minor Scale, is very easy to find musical examples of. It is very popularly used in all music, but especially in classical music and metal. A very good example of the natural minor sound would be Metallica's Black Album ballad 'Nothing Else Matters', a tab for which can easily be found in The Tab Library. I'll feature the link at the end of the article.
Consider the following tab.
 That is the C Ionian played on one string to easily reveal the steps.

And that is the C Aeolian shewn in a likewise manner.
Here is the C Aeolian played in an open string position, for one octave from C to C.

In the first position without open strings,

In a second position, for two octaves, from C to C,

In a third, again two octaves,

And finally, linking a few positions together.

Play the scales over a C minor chord, and experiment. Look for patterns. Once I've covered every mode individually I will offer an article on the patterns existing between them.
If you enjoyed this article and/or found it helpful, please feel free to subscribe to my blog or like my facebook page. Should you have any queries about my services or anything that I've written, why not leave a comment, or drop me an email. I'll get back to you as soon as I can.
Till next time, I wish you all the good times and all your favorite hamburgers. Radcore.
P.S. I said I'd post a link to the Tab Library. You need Powertabs to use it. If you don't have Powertabs, click the link below.
http://www.power-tab.net/guitar.php
It's free, and the file is tiny.
Then, visit the tab library. Search there for the tune you want the music for and download it. It is quick and easy.
www.tablibrary.com
The subject of today's article - the Aeolian mode - can also be referred to as the Natural Minor Scale. I always begin by offering up the C major scale (or, in other words, the C Ionian mode) as it is by altering this scale that one acquires the others.

The C Aeolian differs from the C ionian as follows:
The Aeolian mode, or Natural Minor Scale, is very easy to find musical examples of. It is very popularly used in all music, but especially in classical music and metal. A very good example of the natural minor sound would be Metallica's Black Album ballad 'Nothing Else Matters', a tab for which can easily be found in The Tab Library. I'll feature the link at the end of the article.
Consider the following tab.


And that is the C Aeolian shewn in a likewise manner.
Here is the C Aeolian played in an open string position, for one octave from C to C.

In the first position without open strings,

In a second position, for two octaves, from C to C,

In a third, again two octaves,

And finally, linking a few positions together.

Play the scales over a C minor chord, and experiment. Look for patterns. Once I've covered every mode individually I will offer an article on the patterns existing between them.
If you enjoyed this article and/or found it helpful, please feel free to subscribe to my blog or like my facebook page. Should you have any queries about my services or anything that I've written, why not leave a comment, or drop me an email. I'll get back to you as soon as I can.
Till next time, I wish you all the good times and all your favorite hamburgers. Radcore.
P.S. I said I'd post a link to the Tab Library. You need Powertabs to use it. If you don't have Powertabs, click the link below.
http://www.power-tab.net/guitar.php
It's free, and the file is tiny.
Then, visit the tab library. Search there for the tune you want the music for and download it. It is quick and easy.
www.tablibrary.com
Thursday 10 November 2011
The CAGED beast. Playing chords all over the neck of your guitar fluently.
This article will only really serve as a brief introduction to the CAGED system of playing guitar. I'm only publishing it to demystify it a little for those who are unfamiliar with the concept. It's really very simple as a concept, and works on a premise of remembering 5 basic open chord shapes, and transposing them up the fretboard toward the bridge by barring off where the guitars nut would be, or by simply playing part of the shape.

The CAGED system is also very useful when it comes to melodic playing and soloing. By using the CAGED system, and by consistently applying it, you will find it easier and easier to fluently choose the notes you want to hear, and you'll find that your arpeggiation of melodies will become off the hook.
The concept, as I said, is simple. Consider these open chords.
C

A
 G
G
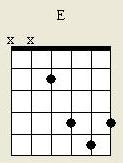
 E
E
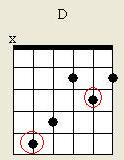
 D
D

All of those chords have specific shapes. The nut of the guitar (which, in my diagrams, is the dark line at the top) is the 'capo' in the open position. that 'capo' can be moved up the neck. You do this by barring off where the capo is with your index finger. Let's see if I can find a picture...
Ah!
 In the image above, this fella's finger acts as the capo.
Now, consider these chord diagrams.


 What I've done there is I've taken those five basic open chords and moved each one in turn up a step, barring the notes that need to be parred and omitting the strings that need omitting.
Take the C shape (I'm circling the root note in red),

Take that shape and move it up two frets. Use your little finger (your fourth finger that is) to fret the 5th fret of the 5th string, and lay the other fingers down as the following diagram shows
 and viola! A D chord played using the C shape. This is the basis of how the CAGED system of playing works.
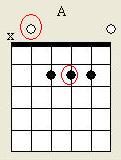
Your A open chord (root circled)
 moved up two frets (a full step) omitting the 6th string and barring the chord from the 5th string
 There you've a B flayed in the A shape.
Next:
 moved up a full step to A:

Your open E major chord
 up a full step to F sharp
 and my last chord pictures for today, open D major
 up a full step to E major.

Take those examples and play around with them. Pay attention to the patterns formed by the root notes in each pattern. That's a great way to know which pattern to play when and where more instinctively. Strum the chords. Arpeggiate them (play them note for note in sequence.) Skip notes. When you're done with all of that, refer back to the article on chord formulae entitled "Slugs and snails...". Then you can figure out how to alter these shapes to include minor chords, sevenths and other altered chords.
Above all, enjoy yourself.
If you enjoyed reading this and found it helpful, please feel free to subscribe to my blog or like my facebook page. I write about music, music theory for guitarists, Luthiery and occasionally post articles of a more general nature.
Also, recently I was given an old camcorder by my brother Andrew, and so soon I will be posting a vlog about guitar playing and some of my favorite places in South Africa, which I hope you'll find entertaining and informative.
I play in a band called The Gent's of Leisure. Visit out facebook page:
www.facebook.com/thegentsofleisure
for some music and news of our when and wheres.
Wyrd.

The CAGED system is also very useful when it comes to melodic playing and soloing. By using the CAGED system, and by consistently applying it, you will find it easier and easier to fluently choose the notes you want to hear, and you'll find that your arpeggiation of melodies will become off the hook.
The concept, as I said, is simple. Consider these open chords.
C

A


All of those chords have specific shapes. The nut of the guitar (which, in my diagrams, is the dark line at the top) is the 'capo' in the open position. that 'capo' can be moved up the neck. You do this by barring off where the capo is with your index finger. Let's see if I can find a picture...
Ah!

Now, consider these chord diagrams.


Take the C shape (I'm circling the root note in red),

Take that shape and move it up two frets. Use your little finger (your fourth finger that is) to fret the 5th fret of the 5th string, and lay the other fingers down as the following diagram shows
Your A open chord (root circled)

Next:


Your open E major chord


Take those examples and play around with them. Pay attention to the patterns formed by the root notes in each pattern. That's a great way to know which pattern to play when and where more instinctively. Strum the chords. Arpeggiate them (play them note for note in sequence.) Skip notes. When you're done with all of that, refer back to the article on chord formulae entitled "Slugs and snails...". Then you can figure out how to alter these shapes to include minor chords, sevenths and other altered chords.
Above all, enjoy yourself.
If you enjoyed reading this and found it helpful, please feel free to subscribe to my blog or like my facebook page. I write about music, music theory for guitarists, Luthiery and occasionally post articles of a more general nature.
Also, recently I was given an old camcorder by my brother Andrew, and so soon I will be posting a vlog about guitar playing and some of my favorite places in South Africa, which I hope you'll find entertaining and informative.
I play in a band called The Gent's of Leisure. Visit out facebook page:
www.facebook.com/thegentsofleisure
for some music and news of our when and wheres.
Wyrd.
Wednesday 9 November 2011
Slugs and snails and puppy-dog tails are what I'm made of, but what are chords made of?
My last entry was all about setting the intonation on a guitar. I posted it because I believe that it is a simple thing to do and every guitarist should know how to do it. Today, I am writing about chord formulation, again, because the principle is simple, and every musician should understand and apply it.
As it is with the modes that I have been writing about, chords are formulated relative to the steps of the major scale. I like to use the key of C major as the basis of my examples because it contains no sharp or flat notes. It runs C, D, E, F, G, A, B and back to C again. Tabbed out on one string:

Now, if you've been around this block a few times already, you will understand that a major scale in any key contains the same steps as any other. There is a whole step (two frets) between the first interval and the second (in this case, fret three the C and fret 5 the D), a whole step between the second step (D fret 5 and E fret 7), and half step (one fret) between the third step (E fret 7 and F fret 8), a whole step between the fourth and fifth steps (F and G), a whole step between the fifth (G) and sixth steps (A), a whole step between the Sixth (A) and seventh (B) notes and finally a half step between the seventh and the eighth (the root note C).
Numerically represented, the major scale simply runs 1, 2, 3, 4, 5, 6, 7.
Chords are made up of arrangements of these notes as represented by their numbers and the characters of those numbers I.e.: are they to be flattened, added etc.
A major chord possesses a triad of notes referred to as a major triad (duh), and is made up of a 1st, a 3rd and a 5th of the major scale. In the case of C major, these are C, E and G. So, a C major open chord looks like this.

A Minor Triad consists of a 1st, a flattened third and a fifth. In the case of C minor the triad looks as follows.

Here is an example of a fleshed out C minor chord.

There we have a chord containing the root (C), The 5th (G), again the root, The flattened 3rd (E flat) and the fifth again (G).
The great Joe Pass was a phenomenal jazz player and a master of chord usage. He used to say that he thought of everything in terms of major, minor and sevenths. So, now lets review the Seventh Chord.
Seventh chords are popular in all forms of music for their openness. They can be 'coloured in' in a great many ways by adding other notes to them. There are three main types of seventh chords: The minor 7th, the dominant 7th and the major seventh.
The formula for a minor seventh chord is 1 (C), flat 3 (E flat), 5, and a flat seven (B flat). A C minor 7 chord can be played as follows:

A dominant 7 chord is a major sounding chord with a flattened 7th note. It's formula is 1 (C), 3 (E), 5(G), flat 7 (B flat). Example:

In the case on a major seven chord, one merely raises the seventh of a dominant chord a half step, thus making it a major interval. The steps making a C major 7 chord are 1(C), 3(E), 5(G) and 7(B).

Now, say we were to continue running up numerically after the 8th (root) note of the scale I.e.: 1(C), 2(D), 3(E), 4(F), 5(G), 6(A), 7(B), 8(C), 9(D), 10(E), 11(F), 12(G) and 13(A). That is what is happening when you see chord names like C9, C11 or C13. These are actually extensions of dominant 7th chords. Look at C9.

There you have a dominant 7th chord with a D one octave up from the 2nd of the C major scale. The notes are 1(C), 3(E), 5(G), dom/flat 7th(B flat) and 9(D). C9.
C11:

C(1), E(3), B flat (flat/dominant 7) and F(11).
C13:

C(1), B(flat 7), E(3), and A(13).
Jimbo Hendrix used this one alot.

Played in C it looks like this:
 The +D is the sharpened 9th degree of C major.
That's enough with the sevenths.
To finish off this article I'd like to say that I believe that, if one only understands the simple numerical representation of the degrees or notes in the major scale, one can can go on to construct any old chord one wants. The types of chords that I've not written about here can easily be worked out under the same principles. Suspended 2nd chords are merely major chords including their second degrees. Suspended 4ths, major chords including their 4th's. Diminished chords have their third and fifth notes flattened. Augmented chords have their 5ths sharpened.
You will find all sorts of chord names as you go along. Minor 7th flat 5's, major 7 flat fives. Really. All sorts. So check them out. Try to figure out what they are asking you for. Once the penny drops, that's if it hasn't already, you will feel awesome.
If you liked this article and found it helpful, please subscribe to my blog. I post often on the subjects of music theory, Luthiery and generally sprout news whenever the spirit takes me. I also play in a band called The Gents of Leisure and you can check out our Facebook page www.facebook.com/thegentsofleisure for some music and news of where and when we are playing.
If you would like me to clarify anything that I've written about, please let me know by emailing me or simply commenting.
Be swell.
As it is with the modes that I have been writing about, chords are formulated relative to the steps of the major scale. I like to use the key of C major as the basis of my examples because it contains no sharp or flat notes. It runs C, D, E, F, G, A, B and back to C again. Tabbed out on one string:

Now, if you've been around this block a few times already, you will understand that a major scale in any key contains the same steps as any other. There is a whole step (two frets) between the first interval and the second (in this case, fret three the C and fret 5 the D), a whole step between the second step (D fret 5 and E fret 7), and half step (one fret) between the third step (E fret 7 and F fret 8), a whole step between the fourth and fifth steps (F and G), a whole step between the fifth (G) and sixth steps (A), a whole step between the Sixth (A) and seventh (B) notes and finally a half step between the seventh and the eighth (the root note C).
Numerically represented, the major scale simply runs 1, 2, 3, 4, 5, 6, 7.
Chords are made up of arrangements of these notes as represented by their numbers and the characters of those numbers I.e.: are they to be flattened, added etc.
A major chord possesses a triad of notes referred to as a major triad (duh), and is made up of a 1st, a 3rd and a 5th of the major scale. In the case of C major, these are C, E and G. So, a C major open chord looks like this.

A Minor Triad consists of a 1st, a flattened third and a fifth. In the case of C minor the triad looks as follows.

Here is an example of a fleshed out C minor chord.

There we have a chord containing the root (C), The 5th (G), again the root, The flattened 3rd (E flat) and the fifth again (G).
The great Joe Pass was a phenomenal jazz player and a master of chord usage. He used to say that he thought of everything in terms of major, minor and sevenths. So, now lets review the Seventh Chord.
Seventh chords are popular in all forms of music for their openness. They can be 'coloured in' in a great many ways by adding other notes to them. There are three main types of seventh chords: The minor 7th, the dominant 7th and the major seventh.
The formula for a minor seventh chord is 1 (C), flat 3 (E flat), 5, and a flat seven (B flat). A C minor 7 chord can be played as follows:

A dominant 7 chord is a major sounding chord with a flattened 7th note. It's formula is 1 (C), 3 (E), 5(G), flat 7 (B flat). Example:

In the case on a major seven chord, one merely raises the seventh of a dominant chord a half step, thus making it a major interval. The steps making a C major 7 chord are 1(C), 3(E), 5(G) and 7(B).

Now, say we were to continue running up numerically after the 8th (root) note of the scale I.e.: 1(C), 2(D), 3(E), 4(F), 5(G), 6(A), 7(B), 8(C), 9(D), 10(E), 11(F), 12(G) and 13(A). That is what is happening when you see chord names like C9, C11 or C13. These are actually extensions of dominant 7th chords. Look at C9.

There you have a dominant 7th chord with a D one octave up from the 2nd of the C major scale. The notes are 1(C), 3(E), 5(G), dom/flat 7th(B flat) and 9(D). C9.
C11:

C(1), E(3), B flat (flat/dominant 7) and F(11).
C13:

C(1), B(flat 7), E(3), and A(13).
Jimbo Hendrix used this one alot.

Played in C it looks like this:

That's enough with the sevenths.
To finish off this article I'd like to say that I believe that, if one only understands the simple numerical representation of the degrees or notes in the major scale, one can can go on to construct any old chord one wants. The types of chords that I've not written about here can easily be worked out under the same principles. Suspended 2nd chords are merely major chords including their second degrees. Suspended 4ths, major chords including their 4th's. Diminished chords have their third and fifth notes flattened. Augmented chords have their 5ths sharpened.
You will find all sorts of chord names as you go along. Minor 7th flat 5's, major 7 flat fives. Really. All sorts. So check them out. Try to figure out what they are asking you for. Once the penny drops, that's if it hasn't already, you will feel awesome.
If you liked this article and found it helpful, please subscribe to my blog. I post often on the subjects of music theory, Luthiery and generally sprout news whenever the spirit takes me. I also play in a band called The Gents of Leisure and you can check out our Facebook page www.facebook.com/thegentsofleisure for some music and news of where and when we are playing.
If you would like me to clarify anything that I've written about, please let me know by emailing me or simply commenting.
Be swell.
Sunday 6 November 2011
Intoning your electric guitar.
It is very difficult to explain using text only, the in's and outs of basic guitar setup. One has to provide some kind of visual presentation, diagrams and what not. Look at mine.
Cool hey? I made it using MS paint. Now I should explain it a little using someone else's picture.

The text on that image is very small indeed. Still, this article is only about intoning your guitar so that it is in tune all the way up the fretboard. Setting the intonation is probably the simplest part of an electric guitar setup, but I have found that many guitarists have no idea how it's done. In this article I will try to clear it up for you.
To intone your electric guitar you need:
- A good, well-fitting screwdriver, flat or phillips depending on the screws used in the bridge. (Sometimes, as is the case with a solid tailed PRS one would need an appropriately sized hexagonal key. I am not going into that today though.)
- An accurate tuner. (I use a Peterson Strobostomp for it's accuracy, but that's possibly a little over-kill. The Peterson Strobostomp is accurate to 0.1%, which not even a talking dog could verify.)
- A little patience.

I have blown up just the two labels because they are the parts (or rather, the set of parts) that we are concerned with now. The bridge is a block to which is mounted a set of saddles. The saddles come in sets of three (as is the case with most Telecasters) and sets of six. A set of six saddles for a Statocaster type guitar looks like this.

Gibson type guitars generally come with Tunomatic bridges. They look like this.
 Take note of the screws entering the Strat typre saddles from the page top and the screws entering the tunomatic going into the page. Strat type saddles are usually mounted with phillips head screws while tunomatics are usually mounted with flat head screws.
The idea behind intoning a guitar string is simple. The note at the 12th fret fretted should be the same note as that string played open but one octave up from it.

That is because the 12th fret should be pretty much at the mid-point of the string.
Step 1.
Play the open string. Ensure that it is in tune.
Step 2.
Play the 12th fret note of the same string. Do not press too hard as this will cause slight deviation in the pitch. While the note is ringing, have a look at your tuner. What does it say?
If the note is flat, it simply means that the string is too long from the saddle to the nut. To correct this, one need only adjust this length by manipulating the screws at the bridge. The note is flat and therefore, the string needs to be shortened. Turn the screw (carefully now, don't damage the head!) the correct way to bring the saddle forward toward the nut. Do this a little bit at a time. Once you have moved the saddle, you will need to repeat steps on and two.
It should be clear then that, should you find the note at fret12 to be sharp, you need to lengthen the string, turning the screw to draw the saddle back and away from the nut.
Keep repeating the steps until the string is perfectly in tune, and then move on to the next, and then the next, until you've done all of them.
Voila!
It is a rare occurrence, but now and again a guitar's bridge might be set in the wrong place by the guitar maker. This doesn't only happen with inexpensive guitars. I have found such mistakes to have been made on Custom Shop Gibson guitars valued at 40 to 50 thousand Rands. If you simply can't get your guitar in tune, this may be the case, but as I said, this rarely happens. Try changing the string first. If the problem persists, ask a Luthier for help.
If you found this all very confusing, please let me know. I'd love to make it as simple to follow as possible.
Metal dudes.
 |
The text on that image is very small indeed. Still, this article is only about intoning your guitar so that it is in tune all the way up the fretboard. Setting the intonation is probably the simplest part of an electric guitar setup, but I have found that many guitarists have no idea how it's done. In this article I will try to clear it up for you.
To intone your electric guitar you need:
- A good, well-fitting screwdriver, flat or phillips depending on the screws used in the bridge. (Sometimes, as is the case with a solid tailed PRS one would need an appropriately sized hexagonal key. I am not going into that today though.)
- An accurate tuner. (I use a Peterson Strobostomp for it's accuracy, but that's possibly a little over-kill. The Peterson Strobostomp is accurate to 0.1%, which not even a talking dog could verify.)
- A little patience.
I have blown up just the two labels because they are the parts (or rather, the set of parts) that we are concerned with now. The bridge is a block to which is mounted a set of saddles. The saddles come in sets of three (as is the case with most Telecasters) and sets of six. A set of six saddles for a Statocaster type guitar looks like this.

Gibson type guitars generally come with Tunomatic bridges. They look like this.

The idea behind intoning a guitar string is simple. The note at the 12th fret fretted should be the same note as that string played open but one octave up from it.

That is because the 12th fret should be pretty much at the mid-point of the string.
Step 1.
Play the open string. Ensure that it is in tune.
Step 2.
Play the 12th fret note of the same string. Do not press too hard as this will cause slight deviation in the pitch. While the note is ringing, have a look at your tuner. What does it say?
If the note is flat, it simply means that the string is too long from the saddle to the nut. To correct this, one need only adjust this length by manipulating the screws at the bridge. The note is flat and therefore, the string needs to be shortened. Turn the screw (carefully now, don't damage the head!) the correct way to bring the saddle forward toward the nut. Do this a little bit at a time. Once you have moved the saddle, you will need to repeat steps on and two.
It should be clear then that, should you find the note at fret12 to be sharp, you need to lengthen the string, turning the screw to draw the saddle back and away from the nut.
Keep repeating the steps until the string is perfectly in tune, and then move on to the next, and then the next, until you've done all of them.
Voila!
It is a rare occurrence, but now and again a guitar's bridge might be set in the wrong place by the guitar maker. This doesn't only happen with inexpensive guitars. I have found such mistakes to have been made on Custom Shop Gibson guitars valued at 40 to 50 thousand Rands. If you simply can't get your guitar in tune, this may be the case, but as I said, this rarely happens. Try changing the string first. If the problem persists, ask a Luthier for help.
If you found this all very confusing, please let me know. I'd love to make it as simple to follow as possible.
Metal dudes.
Subscribe to:
Posts (Atom)