

The CAGED system is also very useful when it comes to melodic playing and soloing. By using the CAGED system, and by consistently applying it, you will find it easier and easier to fluently choose the notes you want to hear, and you'll find that your arpeggiation of melodies will become off the hook.
The concept, as I said, is simple. Consider these open chords.
C

A


All of those chords have specific shapes. The nut of the guitar (which, in my diagrams, is the dark line at the top) is the 'capo' in the open position. that 'capo' can be moved up the neck. You do this by barring off where the capo is with your index finger. Let's see if I can find a picture...
Ah!

Now, consider these chord diagrams.


Take the C shape (I'm circling the root note in red),

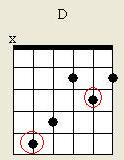
Take that shape and move it up two frets. Use your little finger (your fourth finger that is) to fret the 5th fret of the 5th string, and lay the other fingers down as the following diagram shows
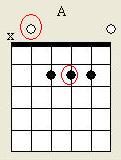
Your A open chord (root circled)

Next:


Your open E major chord


Take those examples and play around with them. Pay attention to the patterns formed by the root notes in each pattern. That's a great way to know which pattern to play when and where more instinctively. Strum the chords. Arpeggiate them (play them note for note in sequence.) Skip notes. When you're done with all of that, refer back to the article on chord formulae entitled "Slugs and snails...". Then you can figure out how to alter these shapes to include minor chords, sevenths and other altered chords.
Above all, enjoy yourself.
If you enjoyed reading this and found it helpful, please feel free to subscribe to my blog or like my facebook page. I write about music, music theory for guitarists, Luthiery and occasionally post articles of a more general nature.
Also, recently I was given an old camcorder by my brother Andrew, and so soon I will be posting a vlog about guitar playing and some of my favorite places in South Africa, which I hope you'll find entertaining and informative.
I play in a band called The Gent's of Leisure. Visit out facebook page:
www.facebook.com/thegentsofleisure
for some music and news of our when and wheres.
Wyrd.
No comments:
Post a Comment